Creating a lush garden can seem impossible in small spaces, especially if you’re limited to an apartment balcony or a tiny backyard. That’s why I put together this post on 12 Stacked Flower Pot Ideas that will not only maximize your vertical space but also add drama to your garden design. If the thought of squeezing greenery into every nook and cranny has you excited, then you’re in the right place!
If you’re someone who loves gardening but struggles with limited space, this guide is tailor-made for you. Whether you’re a seasoned gardener or just starting out, these innovative vertical gardening ideas will help you create stunning flower pot arrangements without taking up too much ground. You’ll discover creative stacking techniques and design inspirations that will keep your urban space feeling fresh and vibrant.
Get ready to explore these space-saving garden ideas that transform your vertical surfaces into eye-catching displays. With practical tips and tricks for flower pot stacking and container gardening, you’ll be equipped to turn your small area into a flourishing green sanctuary. Let’s dive into these dramatic stacked flower pot ideas that will breathe new life into your gardening efforts!
Key Takeaways
– Maximize Vertical Space: Stacked flower pots make use of limited ground space, allowing you to create a lush garden even in small areas.
– Diverse Design Options: From classic towers to colorful mosaics, there are many ways to stack pots that fit your style and available space.
– Utilize Various Materials: You can use traditional clay pots, recycled containers, or wooden frames, offering a range of options for your garden setup.
– Easy Maintenance: Vertical gardens often require less bending and can be easier to care for than traditional gardens, making them perfect for busy urban dwellers.
– Enhance Aesthetics: Stacked flower pots not only save space but also create a visually appealing focal point in your garden area or on your balcony.
1. The Classic Tower
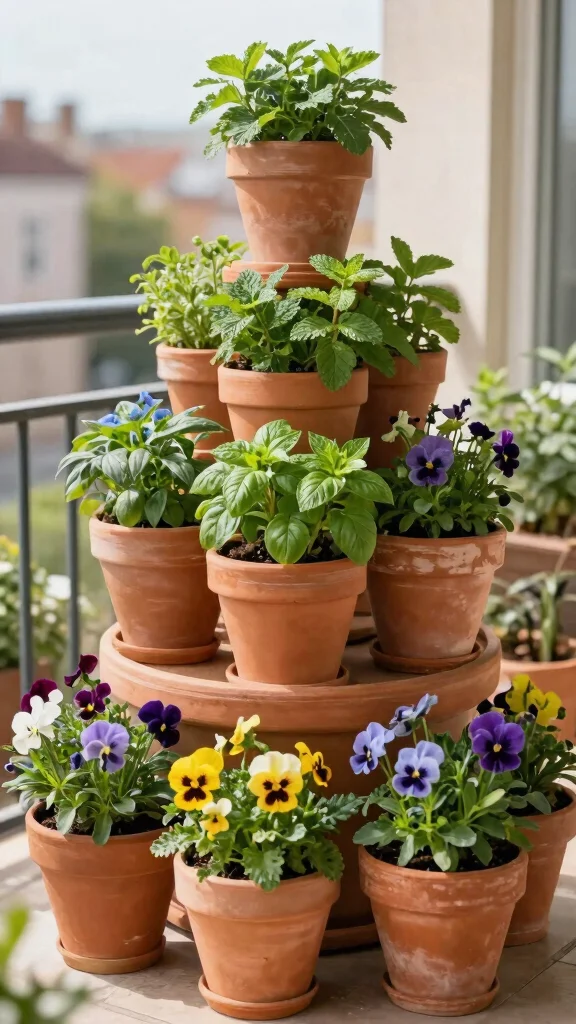
If you’re looking for a captivating way to elevate your gardening experience, the classic tower of stacked flower pots is a fantastic choice. This design not only optimizes space but also creates a stunning focal point in your garden or patio. By using terracotta pots, you can easily build a pyramid structure that offers both aesthetic appeal and practicality. Consider starting your tower with aromatic herbs like basil and mint at the bottom, then layering colorful flowers like violets and pansies as you go up for a vibrant display. The open design ensures your plants receive plenty of sunlight and proper drainage, making it easier for them to thrive.
Begin by selecting a location that receives good sunlight and assess the size of pots you want to use. It’s beneficial to choose lightweight potting soil to keep the structure stable while allowing for moisture retention. A drip tray at the bottom will also help manage excess water, protecting your surfaces from damage.
Key steps to create your tower:
– Choose a sunny spot for optimal growth.
– Start with the largest pot at the base for stability.
– Layer smaller pots as you build, adding soil and plants.
– Continue stacking until you reach your desired height.
– Water thoroughly and enjoy your beautiful tower garden!
This classic design not only enhances your space but also makes gardening accessible and fun, especially for kids eager to learn about plants.
❝ Did you know a five-tier stacked flower pots tower can triple planting density on a small balcony, using 60% less floor space than a traditional bed? Start with basil and mint, then layer violets and pansies for color. ❞
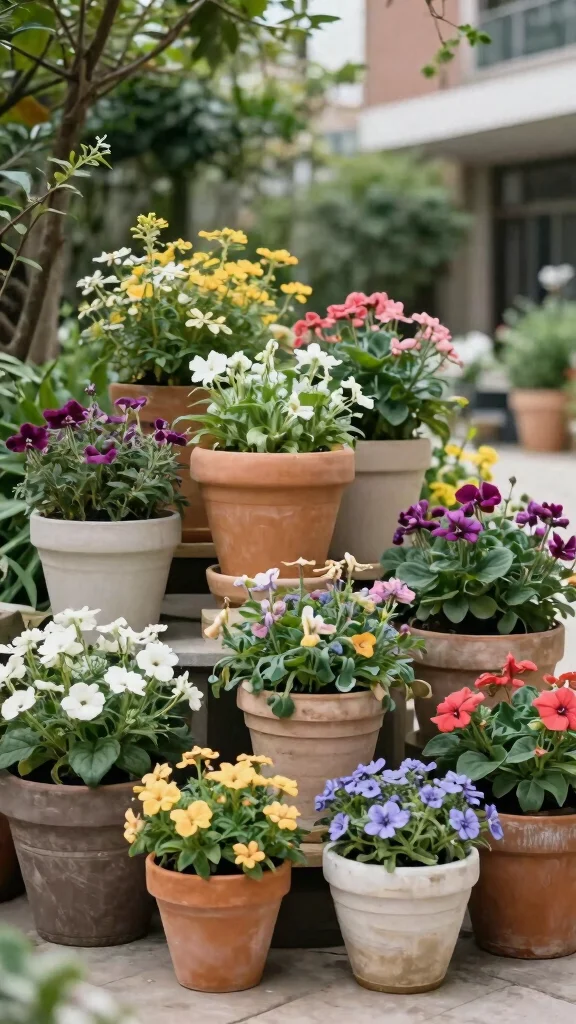
2. Colorful Mosaic
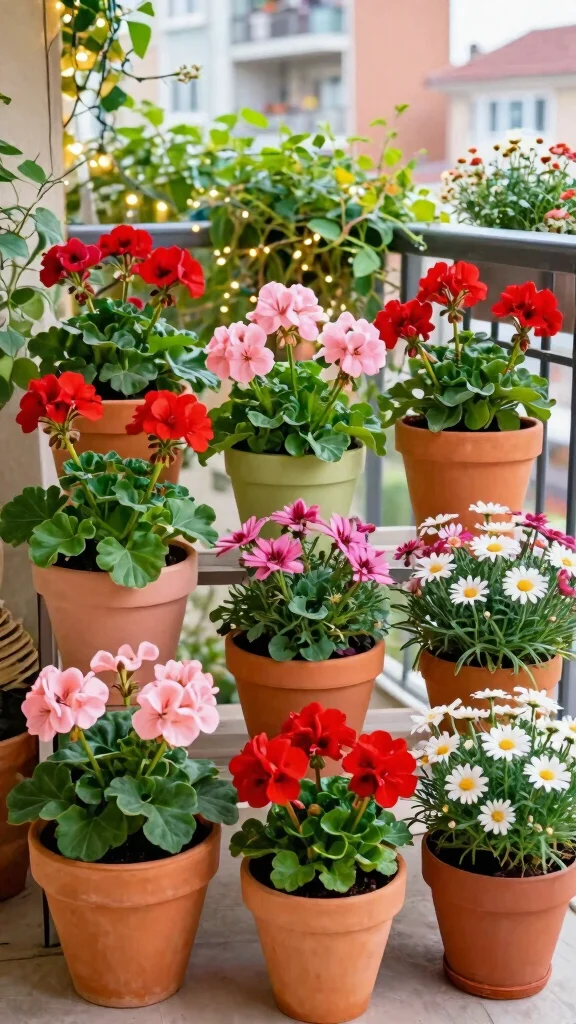
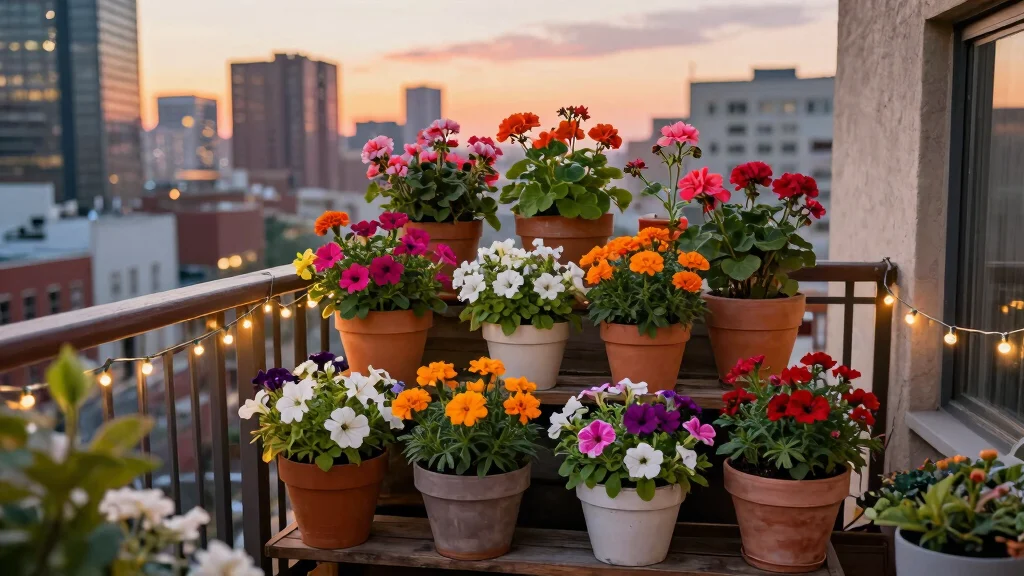
Brighten up your outdoor space with a colorful mosaic of stacked flower pots that showcase your unique style. This fun and creative approach allows you to mix pots of various colors and patterns to create a lively display that reflects your personality. By using materials like ceramic, plastic, and metal, you can craft an eye-catching arrangement that draws the eye in. Choose cheerful flowers such as geraniums, daisies, and coleus to complement your colorful pots and bring your garden to life.
Ensure that your base is sturdy enough to support the weight of the pots stacked above. Grouping plants with similar sunlight and watering needs will help them thrive together, creating a harmonious garden.
Steps to start your colorful mosaic:
– Collect pots in different colors and sizes.
– Fill the largest pot with high-quality soil.
– Plant vibrant flowers in layers, starting from the bottom.
– Secure each pot with soil to stabilize it.
– Water generously and watch your garden flourish!
This vibrant setup not only enhances your garden but also invites creativity, making every glance at your space a joyful experience.
Fun fact: A vertical mosaic of just six stacked flower pots can brighten a balcony by 80% and save space at the same time. Mix ceramic, plastic, and metal, then plant geraniums, daisies, and coleus for a lively, personality-filled display.
3. Vertical Herb Spiral
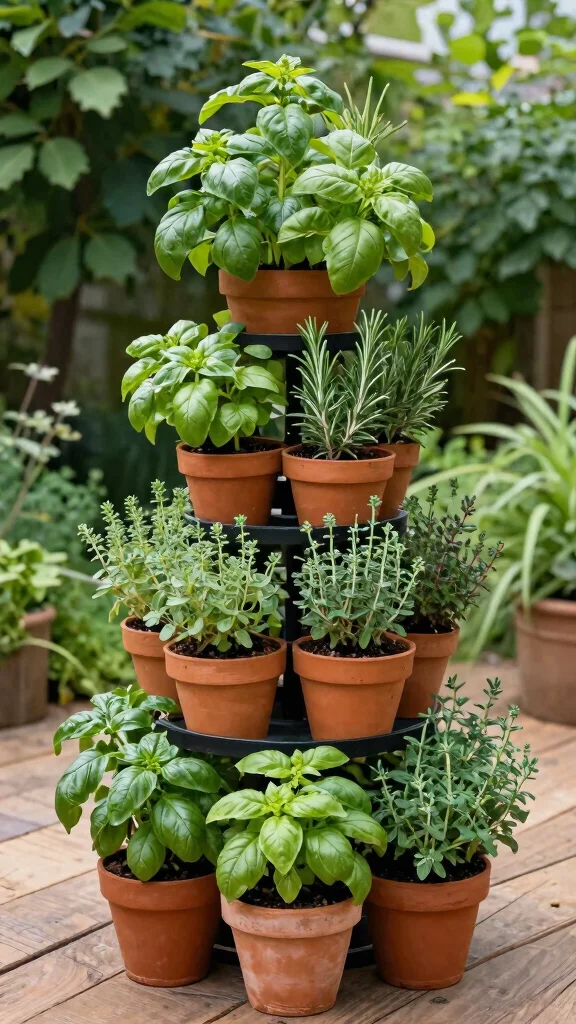
For culinary enthusiasts, a vertical herb spiral is a brilliant way to maximize your gardening space while enjoying fresh herbs all year round. This clever design utilizes a spiral formation that creates different micro-climates for your herbs, allowing you to grow sun-loving basil at the top and shade-preferring parsley at the bottom. Each pot can be labeled for easy identification, making it convenient to harvest the herbs you need.
To ensure your herbs are well-watered, make sure each pot has drainage holes, allowing water to trickle down the spiral. This method not only conserves space but also encourages a thriving herb garden right at your fingertips.
Steps to create your vertical herb spiral:
– Choose a sunny location for optimal growth.
– Start with a large pot filled with nutrient-rich soil.
– Stack pots in a spiral, planting herbs suited for each section.
– Water consistently to keep herbs healthy and thriving.
This approach not only beautifies your space but also provides easy access to fresh herbs for your culinary creations.
4. The Cascading Garden
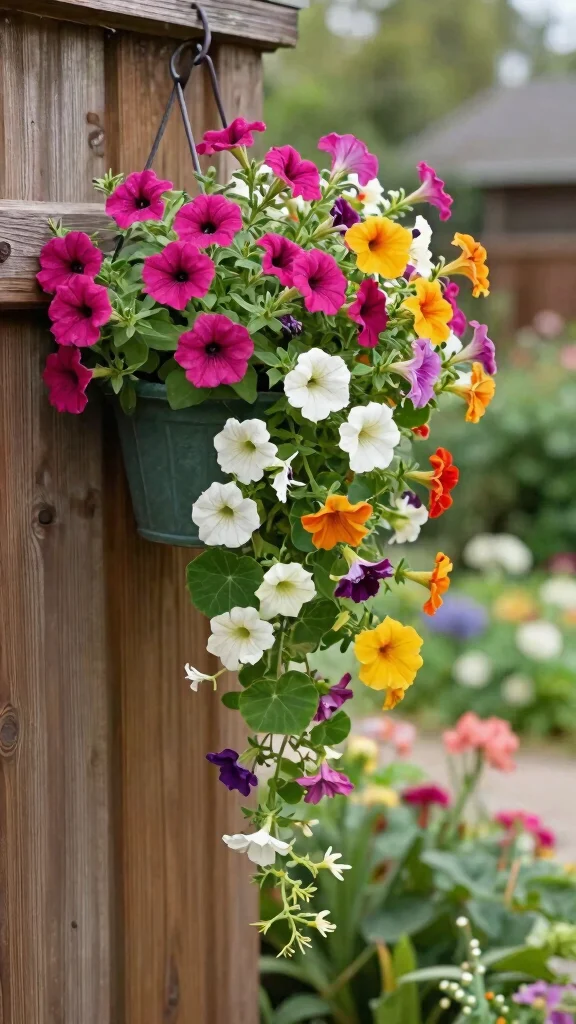
Create a dramatic visual impact with a cascading flower pot arrangement that transforms empty walls or fences into stunning displays. This beautiful design mimics the look of a waterfall, where flowers spill over the edges of each tier, adding movement and life to your space. Incorporate climbing plants like nasturtiums or trailing petunias for a truly captivating effect. Begin your arrangement at the top and work your way down, ensuring the pots are lightweight and easy to hang for safety.
To enhance stability, consider adding a trellis or support structure that can hold the weight of the pots. Grouping plants with similar watering needs together will simplify maintenance and ensure a thriving garden.
Steps to create your cascading garden:
– Find a suitable wall or fence for your pots.
– Install a sturdy bracket for the top pot.
– Secure your first pot with cascading plants.
– Continue adding pots downward, layering flowers.
– Regularly check water levels to maintain their beauty!
This arrangement not only beautifies your space but also creates a serene atmosphere, perfect for relaxation and enjoyment.
How To Choose the Right Stacked Flower Pots
Selecting the best stacked flower pots for your vertical garden can greatly impact your gardening experience. Here are some important criteria to consider before making your purchase:
1. Size Matters
The size of your stacked flower pots is crucial. Consider the height and width of the pots. If you have limited space, opt for smaller pots that can be easily stacked. Typically, a good height is around 3-4 feet for easy access. If you plan on growing larger plants, ensure your pots are wide enough to accommodate their roots.
2. Material Choice
Different materials offer various benefits. Plastic pots are lightweight and affordable, making them easy to move. Ceramic pots, while heavier, add aesthetic appeal and durability. Metal pots can give a rustic look but may require additional insulation to protect roots from heat. Choose materials based on your style, budget, and the plants’ needs.
3. Drainage Features
Proper drainage is vital for healthy plants. Look for pots with drainage holes at the bottom. This feature prevents water from accumulating, which can lead to root rot. If you find pots without drainage, consider drilling holes yourself or placing them over a layer of gravel to facilitate drainage.
4. Design and Aesthetics
The design of your stacked flower pots should complement your garden style. Consider colorful mosaic patterns or rustic wooden designs depending on your taste. A visually appealing arrangement can enhance your garden’s appearance. Remember, the look of your pots can also influence the atmosphere of your space.
5. Weight and Stability
Because stacked flower pots can become top-heavy, it’s important to choose pots that provide stability. When planting larger or heavier plants at the top, ensure that the base is sturdy enough to support the weight. Look for pots with a wider base or those designed specifically for stacking safely.
6. Budget Considerations
Lastly, set a budget for your stacked flower pots. Prices can vary based on size, material, and design. Compare prices at local stores and online retailers. Sometimes, investing a bit more for durable materials will save you money in the long run by avoiding replacements.
Pro Tip: Always check for warranties or guarantees when purchasing pots. This can provide peace of mind in case of unexpected issues!
5. Rustic Wooden Ladder
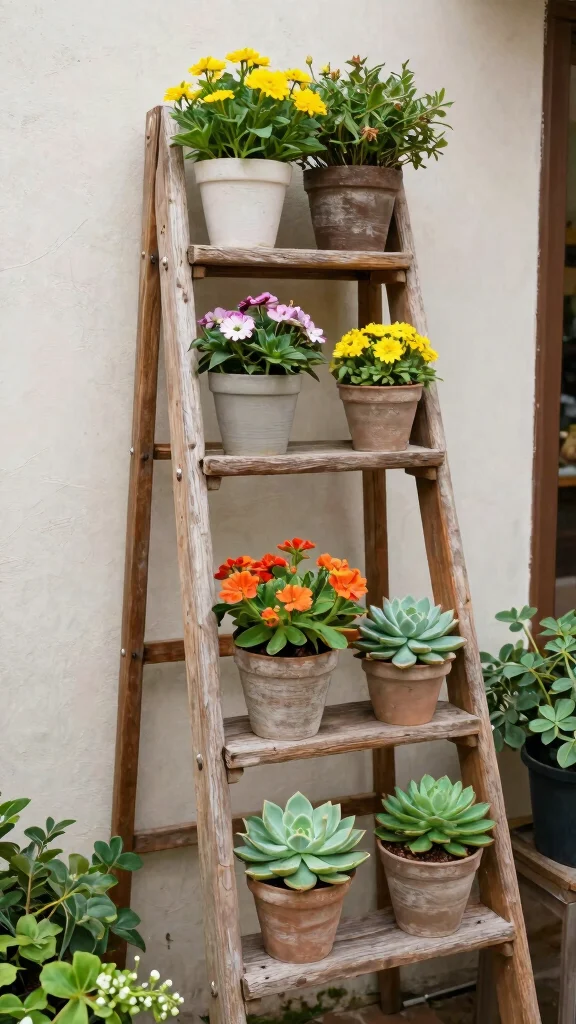
Add a touch of rustic charm to your garden by repurposing an old wooden ladder as a unique display for your flower pots. Lean the ladder against a wall or fence, using each step to hold pots at different heights for a visually interesting arrangement. This design not only makes use of vertical space but also creates a playful and organized feel with a mix of colorful flower arrangements and small succulents.
Ensure the ladder is stable enough to support the weight of the pots, and consider giving it a fresh coat of paint for added flair. Smaller pots work great on the top rungs, while larger ones can comfortably sit on the lower steps.
Steps to create your rustic wooden ladder garden:
– Find a sturdy wooden ladder and position it in a sunny area.
– Paint or stain the ladder if desired for aesthetic appeal.
– Place pots securely on the rungs to prevent tipping.
– Fill each pot with a vibrant mix of flowers or succulents.
This charming display not only enhances your garden’s aesthetics but also invites creativity and a sense of adventure in your gardening journey.
6. Recycled Container Garden
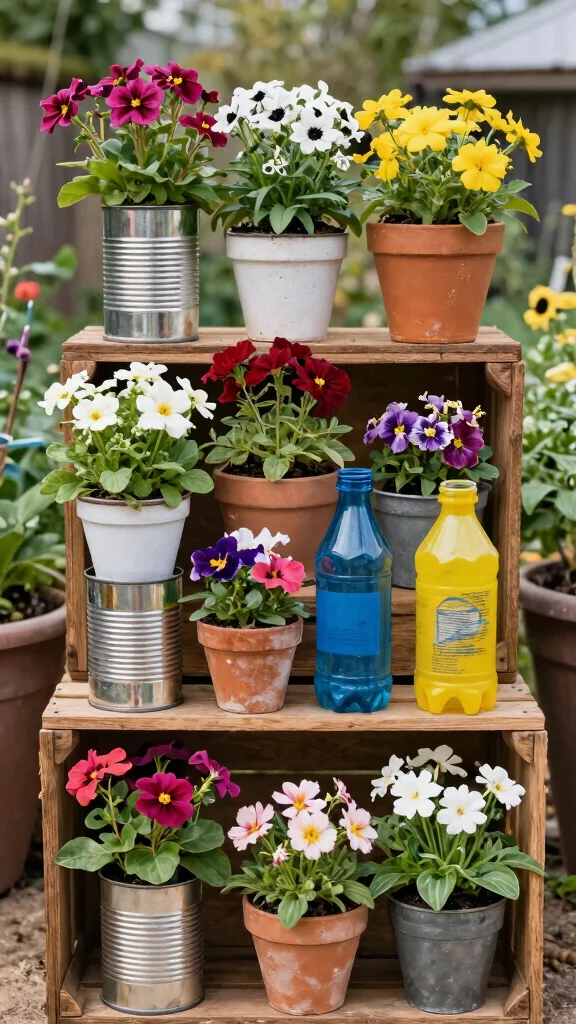
Embrace eco-friendliness by creating a stacked flower pot garden using recycled materials. Old tin cans, wooden crates, or even plastic bottles can serve as whimsical containers for your plants, adding a unique touch to your garden. This approach allows you to express your creativity while being environmentally conscious, making it a fun project for you and your family.
Be sure to punch holes in the bottom of each container for proper drainage. Feel free to paint your containers for a cohesive look, and layer different plants to create a beautiful visual contrast in your garden.
Steps to get started with your recycled container garden:
– Gather various recycled containers and clean them thoroughly.
– Ensure drainage holes are created if they don’t exist.
– Stack containers creatively, starting with larger ones on the bottom.
– Fill each container with potting soil and plant your chosen flowers.
This eco-friendly garden not only beautifies your space but also promotes sustainability, making your gardening experience even more rewarding.
7. Suspended Flower Pots
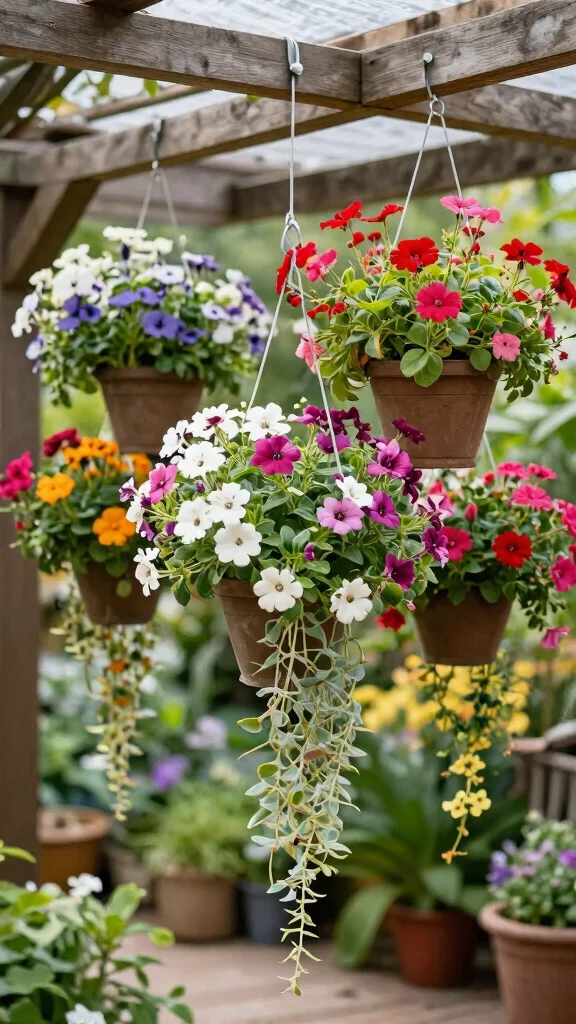
Take your vertical gardening to new heights with suspended flower pots that create a floating garden effect in your urban setting. Using macramé hangers, wire baskets, or hooks, you can suspend pots at various heights, adding depth and dimension to your space. This design allows for creative combinations of flowers that can be admired from all angles, whether you choose trailing plants for elegance or vibrant blooms for a bold statement.
Ensure that your hangers are secure and that all pots have proper drainage to prevent water buildup. By mixing heights, you can create a dynamic layout that draws the eye and captivates your guests.
Steps to create your suspended flower pots:
– Choose a sunny location with enough height for hanging.
– Install hooks or use macramé hangers to secure your pots.
– Select an assortment of flowers and pot them with soil.
– Hang each pot at different heights for a cascading effect.
This floating garden not only elevates your space but also introduces a touch of whimsy and charm to your home.
Did you know that three suspended flower pots can triple your greenery in a small apartment? Mix trailing blooms with stacked flower pots for a floating garden that’s stylish, space-saving, and incredibly easy to update.
8. Green Wall Garden
Transform a plain wall into a lush living masterpiece with a green wall garden made from stacked pots. This modern take on vertical gardening not only enriches your urban environment but also promotes better air quality and aesthetic appeal. Utilize wall-mounted planters or stacked pots to create a vibrant tapestry of flowers and greenery, ensuring a visually stunning display that captures attention.
Select plants of varying heights and textures to enhance the dynamic look of your green wall. Make sure the wall can support the weight of the pots and soil, and consider proper irrigation techniques to keep your plants hydrated.
Steps to create your green wall garden:
– Choose a wall with strong support for pots.
– Use wall brackets or mount planters directly.
– Fill pots with soil and arrange plants by height.
– Water adequately and prune regularly for optimal health.
This green wall garden not only beautifies your space but also turns an ordinary wall into an extraordinary living feature.
9. DIY Pallet Planter
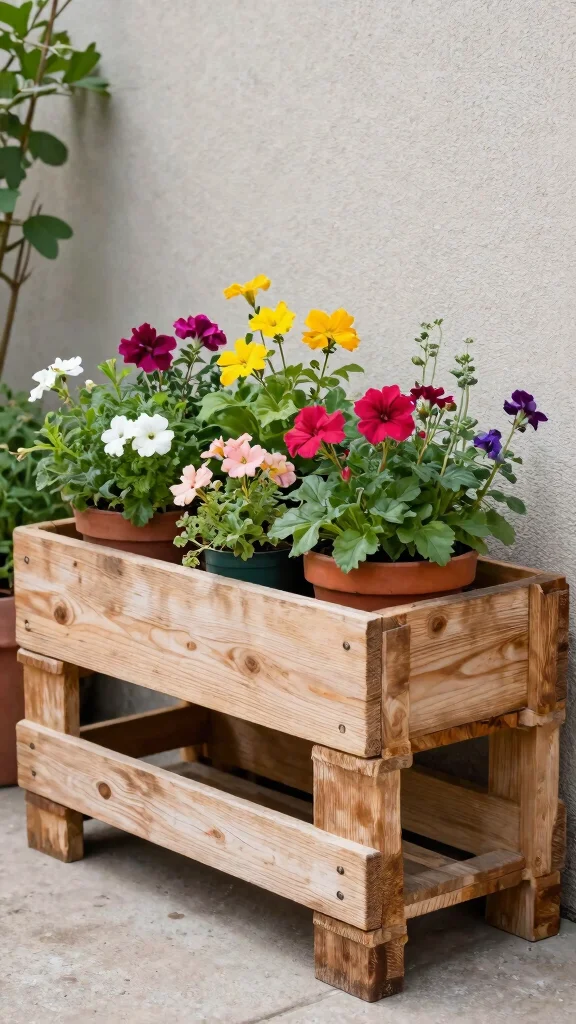
Repurpose a wooden pallet to create a stunning vertical garden that utilizes space efficiently. By attaching flower pots to the slats of a pallet, you can craft a multi-tiered display that is both functional and beautiful. This DIY project encourages creativity and sustainability, allowing you to fill each pot with a mix of flowers and herbs for a delightful garden experience.
Consider sanding down the pallet to remove splinters and adding a plastic liner for better soil retention and easy watering. This setup not only looks appealing but also allows for convenient harvesting right from your balcony.
Steps to create your DIY pallet planter:
– Source a sturdy wooden pallet and clean it thoroughly.
– Attach pots to the slats securely with screws or wire.
– Fill pots with soil and plant your selected varieties.
– Position your pallet in a sunny spot and water regularly.
This creative approach not only adds charm to your outdoor space but also makes gardening accessible and fun.
10. Tiered Plant Stand
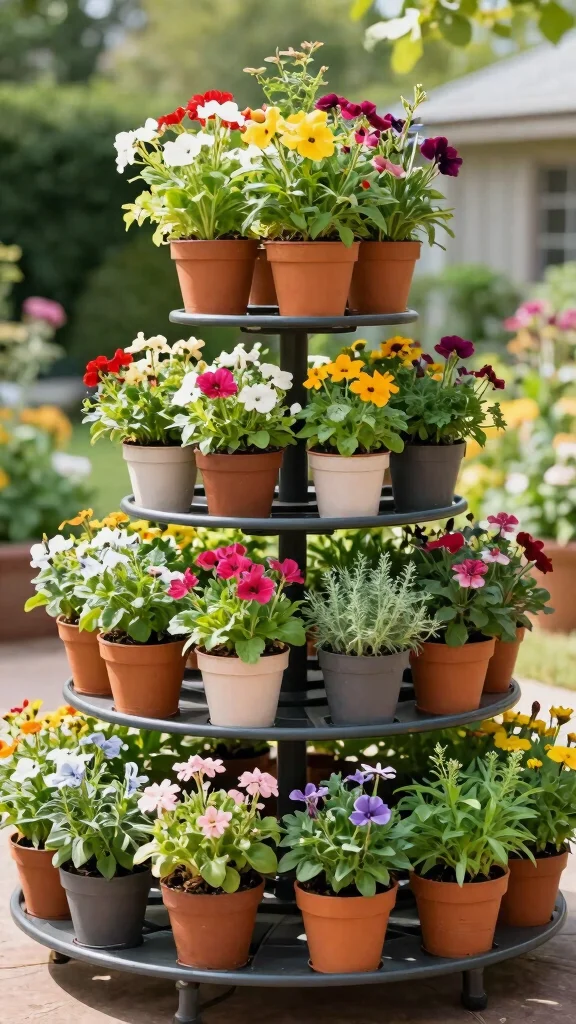
A tiered plant stand offers an elegant way to showcase a variety of pots while saving precious space. This setup allows for a neat arrangement of plants at different heights, making it easy to care for and appreciate each one. Choose a stand made of wood or metal that complements your garden style, and fill each tier with colorful pots bursting with seasonal flowers or herbs.
This design maximizes sunlight exposure for all plants, promoting a healthier and more vibrant garden. Mixing plants of varying heights adds visual interest and enhances the overall appeal of your garden setup.
Steps to create your tiered plant stand:
– Select a tiered plant stand that fits your space well.
– Fill each pot with soil and your chosen plants.
– Arrange pots by height for a layered look.
– Water as needed and enjoy your organized garden!
This tiered design not only beautifies your space but also makes caring for your plants a delightful experience.
11. Vertical Succulent Garden
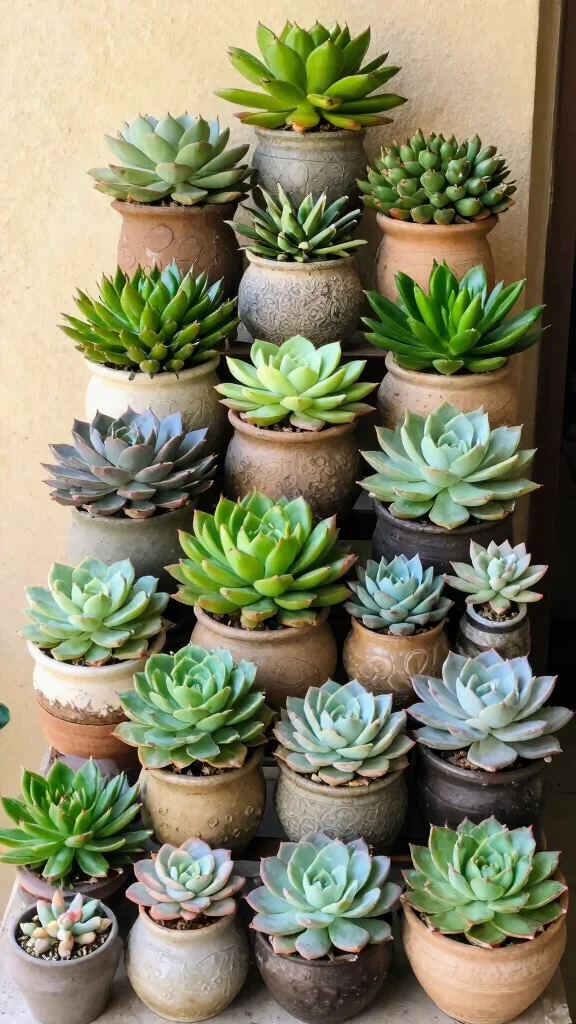
For those who appreciate low-maintenance gardening, a vertical succulent garden is a fantastic option. Stack pots filled with various succulent species, showcasing their unique shapes and colors. This type of garden is perfect for urban dwellers who love greenery but may not have time for traditional plant care. Succulents thrive in sunny areas and require minimal watering, making them ideal for busy lifestyles.
Ensure you use well-draining soil and pots with drainage holes to keep your succulents healthy. Mixing different varieties will create a stunning display that captivates the eye and adds personality to your stacked garden.
Steps to create your vertical succulent garden:
– Choose a sunny location for your pots.
– Use well-draining soil specifically designed for succulents.
– Stack pots, starting with larger pots at the bottom.
– Fill pots with a variety of succulents, arranging by color and texture.
– Water sparingly and enjoy your low-maintenance oasis!
This arrangement not only enhances your garden but also provides a beautiful and simple way to enjoy vibrant greenery.
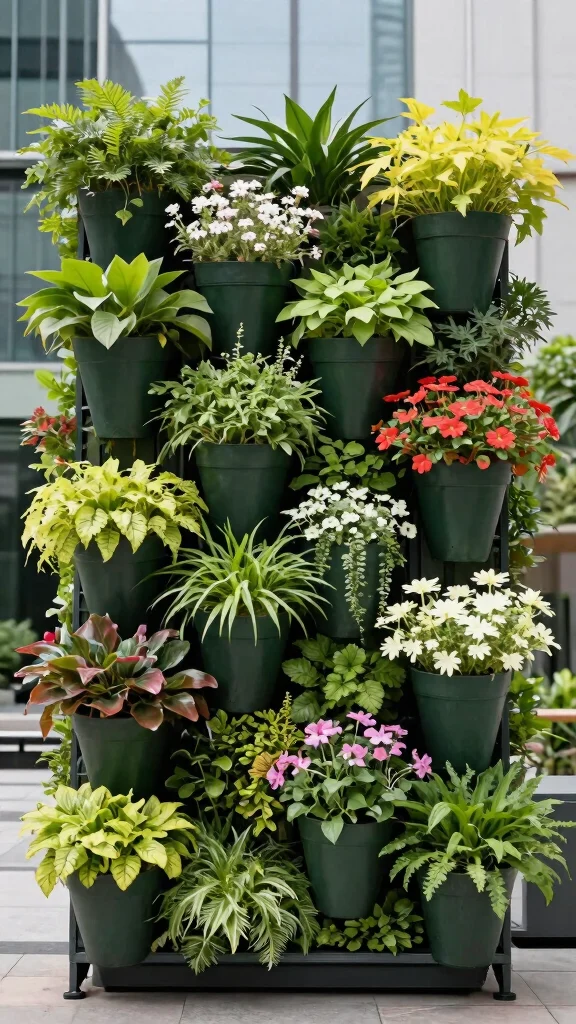
12. Wall-Mounted Flower Rack
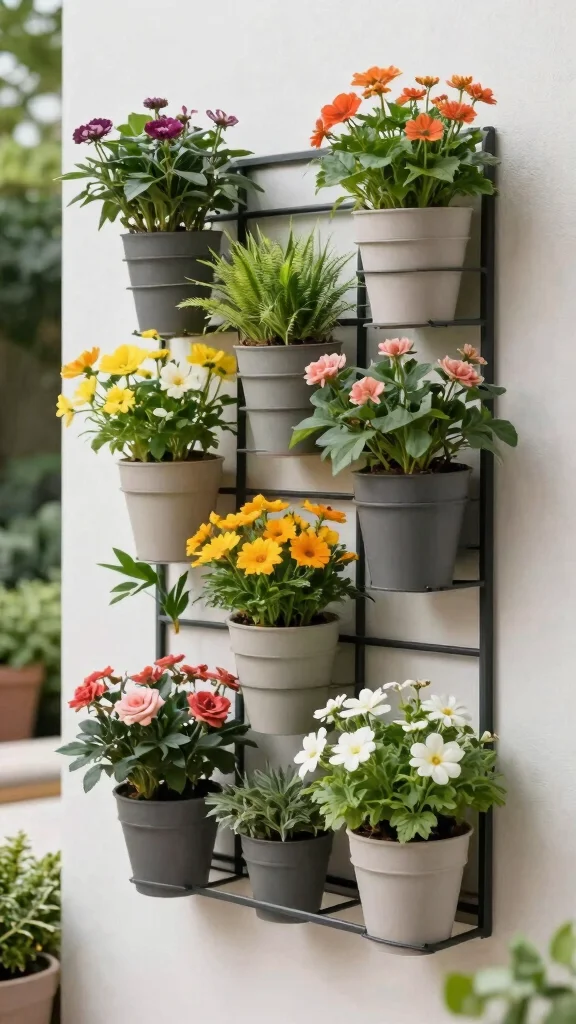
Add a unique vertical garden feature to your space with a wall-mounted flower rack that displays pots at varying heights. This stylish addition not only beautifies your area but also brings a modern flair to your gardening setup. Choose a sturdy wooden or metal rack and fill each level with bright flowers or cascading plants for a visually striking effect.
This arrangement not only creates a stunning visual impact but also allows for easy access for watering and maintenance, making it practical and beautiful.
Steps to create your wall-mounted flower rack:
– Securely install a wall-mounted flower rack.
– Select pots that fit well on the rack’s levels.
– Fill each pot with your favorite flowers or plants.
– Water as needed and enjoy the captivating view!
This setup not only transforms your wall into a vibrant display but also enhances the joy of gardening in your home.
Conclusion
Stacked flower pots are a fantastic way to embrace vertical gardening in small urban spaces.
These creative arrangements not only save space but also bring color and life to your surroundings. From classic towers to cascading designs, there’s no shortage of inspiration for your vertical garden. Experiment with different flowers, pots, and arrangements to find what works best for you. Happy gardening!
Note: We aim to provide accurate product links, but some may occasionally expire or become unavailable. If this happens, please search directly on Amazon for the product or a suitable alternative.
This post contains Amazon affiliate links, meaning we may earn a small commission if you purchase through our links, at no extra cost to you.
Frequently Asked Questions
What are stacked flower pots and how can they create a dramatic vertical garden in small spaces?
Stacked flower pots are multiple containers arranged one above the other to form a vertical column, perfect for balconies or compact patios. They blend vertical gardening with bold vertical flower arrangements ideas to maximize a tiny footprint in your space.
Start with sturdy, well-drained pots, secure stability, and build from bottom to top. Choose a mix of compact plants and trailing varieties to fill gaps, like herbs on top, colorful annuals in the middle, and cascading spillers on the sides. Tip: use potting mix designed for containers and ensure drainage, or try modular stackable systems for a clean, uniform look.
What materials work best for stacked pots in a balcony or urban patio?
For durability and safety, pick materials that withstand weather and weight. Popular options include heavy‑duty plastic stackables, terracotta for a natural look, and lightweight fiberglass or resin that resists cracking in heat.
Whichever you choose, ensure each pot has drainage, add a moisture tray, and consider wall- or railing-mounted supports to stabilize the stack for your space-saving garden ideas. Add a layer of stones or a moisture mat to improve drainage and keep roots happy. Pro tip: anchor to a sturdy surface and check weight when using tall stacks on balconies.
How should I water and maintain a stacked pot vertical garden without overwatering or uneven growth?
Watering stacked pots can be tricky—top pots dry out faster while bottom pots stay wetter. Use a bottom‑up approach with a reservoir or a drip irrigation kit designed for container gardening tips.
Install a self‑watering insert or a small drip line, check moisture with your finger or a meter, water thoroughly until you see drainage, and avoid leaves sitting in water. Feed with a balanced, diluted fertilizer every 3–4 weeks during the growing season. Prune and pinch regularly to keep a full look and rotate plants so each side gets light for even growth.
Which plants thrive in stacked pots and how should I plan vertical flower arrangements?
Look for compact or dwarf varieties that perform well in containers and adapt to a vertical layout. Good picks include herbs like basil, thyme and oregano, trailing petunias, lobelia, sweet alyssum, calibrachoa, and French marigolds. Place sun-loving plants on the top and middle levels, and choose shade‑tolerant options on lower levels if needed. Mix foliage with color—variegated ivy, coleus, and small grasses add depth for a dramatic vertical flower arrangement.
Container gardening tips: use similarly sized pots or vary heights for interest, and consider a drip system for even moisture.
Can I customize stacked pot ideas to fit different spaces and budgets?
Absolutely. Start by measuring your space, decide how many levels you want, and choose a color palette that complements your area.
Budget-friendly options include reusing old pots, thrifting for compatible pieces, or building stacks with simple materials like stackable planters or cinder blocks and a breathable lining. For a polished look, keep a consistent pot style and add a small vertical support or trellis for stability. Plan plants according to sunlight and care time so your space-saving garden ideas stay stunning and manageable.
Related Topics
stacked flower pots
vertical gardening
space-saving garden
container gardening
urban gardening
flower pot stacking
small space design
beginner friendly
DIY vertical garden
vertical flower arrangements
indoor gardening
seasonal gardening